Source code:
Content of this post:
- Introduction
- High-level overview of the app
- Before dockerizing
- Docker
- Docker registry
- CI/CD
- Deployment
1) Introduction
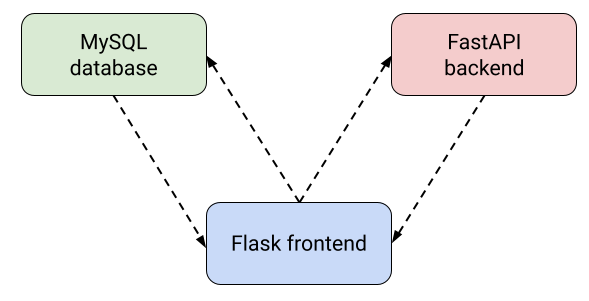
As a non-German speaker living in Switzerland, I often need to quickly translate large texts, but I get annoyed by character limits on Google Translate or DeepL. Learning German may have been a way better call, but instead I decided to deploy a translation application. It’s made of 3 containerized microservices:
- A Flask frontend to get inputs and display translations
- A FastAPI API backend to translate English text, using open-source models (SpaCy, Hugging Face)
- A MySQL database to store previous translations
In this post, we build the containers. In part 2/3, we’ll deploy the app on a single node with Docker Compose. Finally, the app will be deployed on a Kubernetes cluster in part 3/3.
2) High-level overview of the app
-
On its main page, the Flask frontend takes German text as input and sends an HTTP request to the backend, which responds with the translated text. Then, both the original text and the translation are inserted inside the MySQL database.
-
On its secondary page, the frontend takes a SQL query as input, fetch the results from the database and displays the result.
3) Before dockerizing
The first step is to build each microservice directly on our machine, without thinking about Docker. I use a virtual environment for each component (I like Python’s standard venv). This is much more convenient during the development phase since there is no need to rebuild a container every time something changes. In the meantime, I am in control of the modules/python version each microservice needs to work properly.
Below is the venv syntax to create a virtual environment named .venv:
|
|
During this phase, I use the local network to connect the microservices together. I directly hardcode the URLs (like http://localhost:80/) in the components so they can talk to each other.
In this case, we have to write the Flask frontend and the FastAPI backend. For the MySQL database, we’ll use the official container as is.
4) Docker
Once the app works on a local machine, we can start to build container images.
How to Dockerize a microservice
My method is as follows:
-
Get python’s version:
python --versionorpython3 --version -
Write the list of imported packages in a
requirements.txtfile
I’ve seen people using pip freeze > requirements.txt but I prefer to avoid this because it lists every single module in your environment. This includes potentially unnecessary modules that you might have tried during development, or dependencies that do not need to be explicitly listed. So, I manually list the packages I actually import in my scripts: the requirements.txt file is much shorter and readable this way. There is actually a module called pipreqs to automate this process.
- Create a folder/repository with the following structure:
/docker_image_repo
├── workdir
│   ├── script_1.py
│   ├── script_2.py
|   |── some_folder
|   |...
│   ├── requirements.txt
├── Dockerfile
The Dockerfile
With the above steps completed, it is now pretty straightforward to write the Dockerfile. Check out the source for the Flask frontend image or the FastAPI backend image. Let’s look at the backend’s Dockerfile in detail:
|
|
Keep it light
In order to translate with no character limit, the FastAPI backend works as follows:
- Segment the input text in sentences using a SpaCy model
- Translate sentences one by one with 🤗 Hugging Face’s
transformerslibrary
We decompose the work this way because transformers models cannot process long text: they usually take no more than 512 or 1024 words/tokens at a time.
We could put these models in the source code of the Docker image along with the .py scripts, but instead we pull them at image build: through the requirements.txt file for the Spacy model and through the pull_nlp_models.py script for the translation model. We proceed this way for several reasons:
- The models are very heavy and cannot fit in a standard GitHub repository (100 Mo max). Yet we need to store this code in a repo to implement CI/CD
- It is much easier to update or change the models this way
Overall, the point is to keep the source code of a Docker image as light and simple as possible.
5) Docker registry
The point of containers is that they can run anywhere, be it someone’s local machine, a server or a Kubernetes cluster. So they have to be accessible from anywhere. This is exactly the point of a container registry. The syntax is as follows:
|
|
For the translation project, the Docker images live on my personal DockerHub account. When we deploy the app later on, the images will be pulled from there to run the containers.
6) CI/CD with GitHub Actions
It would be nice not having to manually build the image and push it to the registry each time we change something in the source code. This is where GitHub Actions comes in: each push on the repository automatically triggers a build of the image and pushes it to the registry. The detailed steps to implement CI/CD are very well documented on Docker’s official docs.
It actually gets even better than that. If you look at our FastAPI backend image for instance:
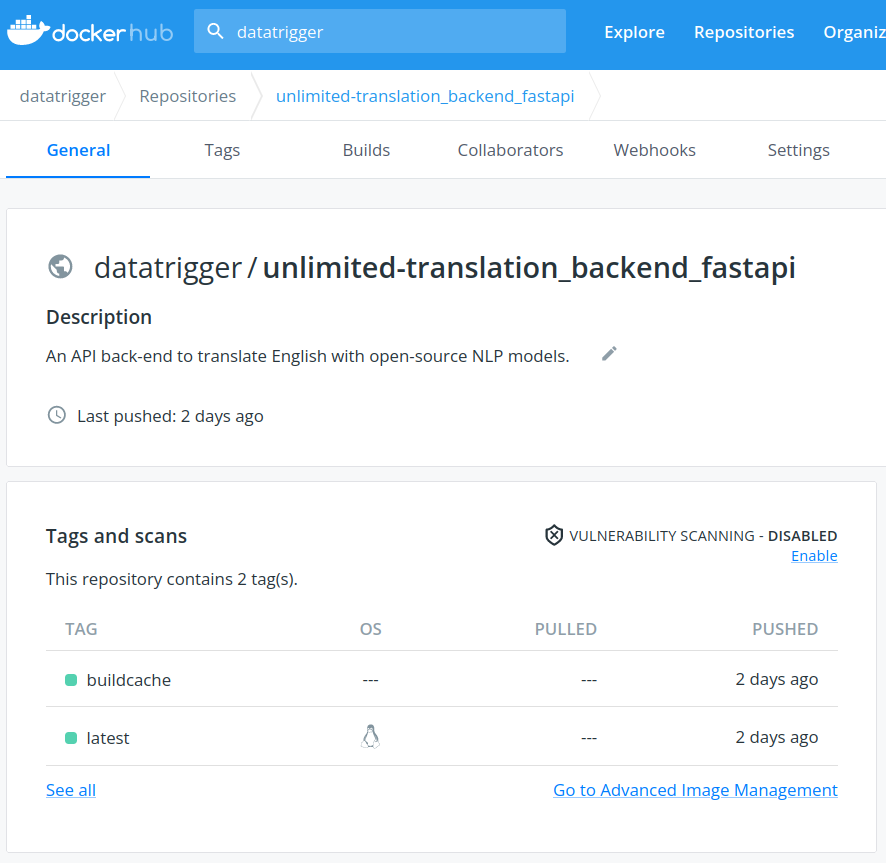
You’ll see the image repository has actually two different tags: buildcache and latest.
latest is the tag of the actual image of the container. What about buildcache? GitHub Actions looks at this file to know which parts of the image are impacted by the latest changes pushed to the source repository. This allows not to re-build the entire image at each push, but just the impacted layers. This saves a huge amount of time, especially with heavy images like the FastAPI backend (2+ Go) with heavy ML models embedded in it.
7) Deployment
After developing and testing our microservices locally, we built container images and pushed them to a registry in a CI/CD framework. We can now easily maintain them and pull them from anywhere for deployment. Let’s see how that goes in the next post.